Photography: Oil And Water

Slow Motion Beauty of Oil On Water
Anyone new to photography will want to try the technique of shooting oil and water. As every single image will be different, the possibility of a capturing a few beautiful shots is good. One of the earliest photo tutorials I read about encouraged me to set up a photoshoot in my kitchen, using just water, ordinary cooking oil and a few household objects.
The fact that oil and water don't mix makes every image so different from the one before, and depending on how often you wish to change the background, you can shoot away until you have a wide range of images on the theme.
It becomes rather mesmerising after a while as you watch the slow movement of the oil globules as they glide their way over the water - what better way to relax!
The object of the exercise is to improve the quality of your photography and learn how to shoot using the Manual modes rather than always relying on Auto.
Take a look at some other abstract images here
OR click below for more general images:
Photo: © Rob Hemphill
How To Set Up Your Camera And Accessories
From your kitchen!
What you will need
Camera with lens - a macro lens works best, but it's probably not in everyone's kitbag, although for this exercise any telephoto lens that gives good zoom could be used. The closer detail you can see, the better.
Tripod - Vital for stability to avoiding camera shake.
Pyrex bowl - A clear water container.
Cooking oil - Only a few drops will be required.
Colored image - or material to be placed under the bowl.
Useful Photography Books - Help to improve your technique


What To Do Next
Setting up your shoot
- The pyrex bowl with water will need to be placed about 3-4" above the table top, then a light source can be shone from underneath. Get 2 lengths of 3"x2" pieces of wood, set them onto the table so they'll be able to support the bowl and image card at each side.
- Slide a piece of multicolored card, or other such brightly colored image, immediately under the bowl and also resting on the timbers.
- With the camera on a tripod beside the table, set it up it directly over the bowl (about 10-12" focal distance - depending on what type of lens you're using) facing down.
- Find a good light source, like a desk lamp or remote flash unit, and place under the image and bowl.
- Drip a small quantity of oil onto the water, and mix around a little.
- Take care to focus accurately on the oil and shoot away. To avoid camera shake, shoot using the timer or remote cable release - have fun, and I'll bet you'll get some great images
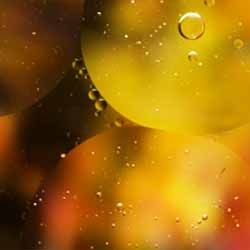
Rainbow Warrior

ISO400, f5.6, 1/30
Shooting this was challenging to get the vivid colors to show through the main drop. I had to place a light under the bright colored backing image, and hope that a droplet would float over the exact point where the camera was pre-focused (on the surface of the water) where the light was brightest.
Photo: © Rob Hemphill
Oil and Water Don't Mix - Or Do They?
Oil and water don't mix - the mantra is familiar to every schoolchild. You have to shake them to overcome the forces that hold the oil together.
But If you were able to first remove any gas that's dissolved in the water, it will mix spontaneously and even stay that way indefinitely, according to chemist Ric Pashley of the Australian National University in Canberra.
If confirmed, the finding could provide clues to one of chemistry's most puzzling phenomena. This is the so-called long-range hydrophobic force, which causes oil surfaces to attract one another over what to chemists are remarkably long distances.
Read more here...
from NewScientist
Image by Rob Hemphill
What Flash Do I Use?
You mustn't use the on-camera flash for this project as all you'll get is the reflected glare back from the water surface.
The recommended way to photograph the oil, is by shining the light up from underneath, projecting the beam upwards through the water and oil, thus giving nice bright colors. The simplest way is just to shine a torch or desk lamp, however, if you want to get creative, use an off-camera flash unit such as a Speedlight. These can be used on camera or placed remotely, to receive a wireless signal, from the camera. Different color materials can be hung over the unit to change the base color scheme.
See Speedlights and Pocket Wizards on Amazon, and read useful reviews by clicking links below:
Mother Nature

ISO200, f5.3, 1/60
This image shows a bubble caught in motion. The large bubble on the right has just bumped into the big bubble underneath, but as the shutter speed was set at 1/60 sec, it is in sharp focus.
Photo: © Rob Hemphill

The Best Macro Lens To Use
I have used a 105mm micro lens from Nikkor for all these images. As I have found this to be such an amazing close-up lens, I have written about it in detail outlining its technical specifications, with a gallery of images taken specifically with this macro.
The best Nikon macro lens has loads of information, and where to get the best deals for this lens.
Photo: © Rob Hemphill
All Things Oil And Water - Differences require tolerance


Engine Oil on a Water Puddle

ISO200, f11, 0.8
Shooting this was challenging, in order to get the vivid colors to show through the main drop. I had to place a light under the bright colored backing image, and hope that a droplet would float over the exact point where the camera was pre-focused (on the surface of the water), where the light was concentrated.
Photo: © Rob Hemphill
Oil on Water in Mirissa Harbor
Buy at Art.com
Oil Droplets Suspended on Surface of Water
Buy at Art.com
Oil and Water Photo Gallery
Click thumbnail to view full-size


Do let me know whether you have tried this or any other similar technique to help further your photography skills.


